How To
How to Take a Screenshot on iPhone?
How many times per day do you take a screenshot on your phone? It’s the perfect way to capture special or funny moments, save great ideas, or get proof of something.
Keep scrolling in this article In case you don’t know how to take a screenshot on your iPhone. We’ll show you all the possible ways to capture a screenshot including some unpopular tricks to do so.
More like this:
Why Do People Usually Take Screenshots on their phones?
People usually take screenshots on their iPhones for many reasons including:
- Avoid going back and forth between multiple recipes – screenshot and swipe!
- Save a picture to use as wallpaper on your phone
- Easily access a Facebook post or link later on
- Save gift ideas
- Show someone a high score on a game
- Help someone understand something
- For kids to show their parents an inappropriate comment on social media in case it’s deleted later
- Help remember something
- Save gift card bar codes
- Save great ideas to remember later
- Snapchat
- Share ridiculous things you see on social media with a friend (we all do it – admit it!)
- Because IFTTT will save it to my dropbox, calendar, or to-do list for me.
- Remember to share something later
- When I’m in a client’s Pinterest account and I see someone I want to follow, I take a screenshot of the profile so I can find it later.
- To easily access a portion of an email, like an address
- Repost a Photo of the Day challenge on Instagram
- Save a picture your child draws or makes in an app
- Quickly save information about great products you find (screenshot the bottle of wine you had at a friend’s house)
- Save craft ideas to try later
- Take a photo of your calendar’s “to do” list for the day
- Get proof of something
- Save shopping lists for easy reference
- Remember great products you see for sale so you can attempt to make your own later
- Save lists you commonly refer to, like Instagram and exercise challenges
- Remember great websites you come across
- Share text conversations you have with your kids
- Save coupon bar codes
- Share a tweet with someone, not on Twitter
- Showing a problem you’re having to a friend when asking for help
The Screenshot Button Combo Depends on Your iPhone Model
Regardless of the iPhone model, taking a screenshot is simple. All you need to know is which buttons to press together.
Apple changed the shortcuts and button combos for several iPhone features from iPhone 6 reaching to newer models lacking a Home button such as iPhone 13.
Thus, the way you capture screenshots changes based on whether you have an iPhone with Face ID or with Apple’s home button.
Either way, screenshots are easy to take and you’ll master it after your first try.
How to Take a Screenshot on iPhone With a Face ID?
If you have an iPhone X-style device (with a notch at the top of the screen) like iPhone X, iPhone 11, iPhone 12, and iPhone 13. Or another iPhone that uses Face ID, you’ll need to use a couple of buttons.
Press on the Sleep/Wake button on the right side of the phone and the Volume Up button on the left side of your device at the same time.
To capture a screenshot for iPhone models with a Face ID, do as follows:
- Press the Sleep/Wake and Volume Up buttons at the same time
- Release both of the buttons
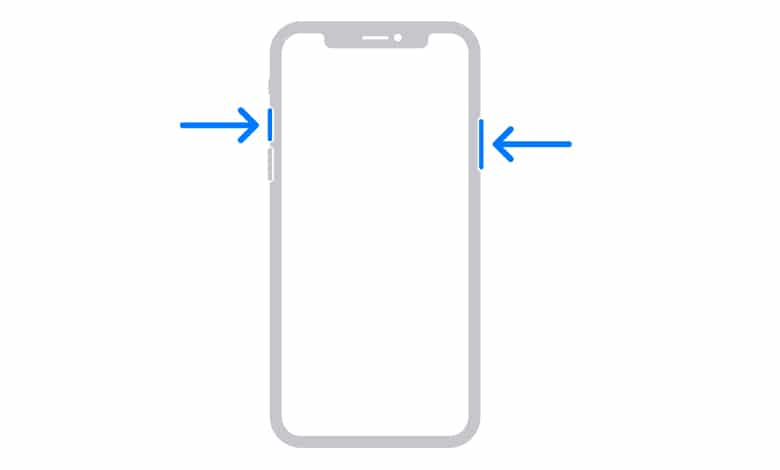
Once you’re done, you should hear a camera shutter sound, as long as your phone’s volume is on. You’ll also see your screen flash followed by a small preview image.
If you do press the buttons for too long, your iPhone will give you the option to turn your phone off. If you keep holding, you’ll activate the Emergency SOS feature that automatically calls for help. You don’t want to do that! So, just a quick press will do the job.
How to Take a Screenshot on iPhone With a Home Button?
As per iPhone with a home button including iPhone 8 and older, or iPhone SE, you’ll use a slightly different method to take a screenshot.
On all iPhone models since iPhone 6, the Sleep/Wake button is required for screenshots. It’s located on the right side of the device.
If you have a first-generation iPhone SE or iPhone 5s or older, this button is on the top of the device instead.
To capture a screenshot for iPhone models with a Home button, do as follows:
- Press and hold the Home button and the Sleep/Wake button at the same time.
- Release both buttons.
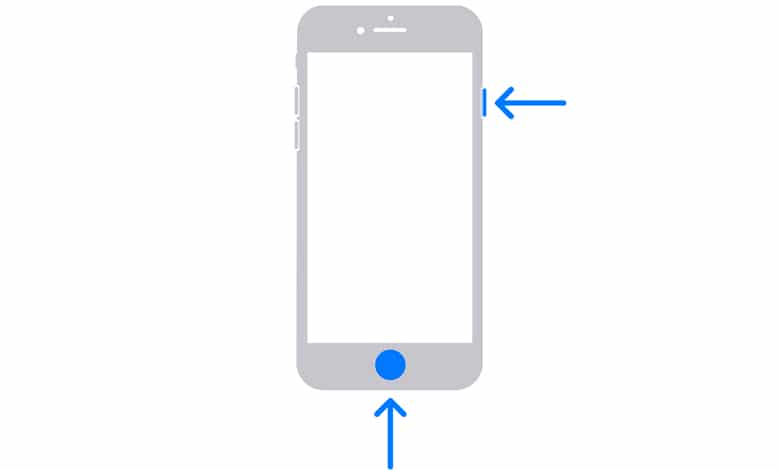
Again, you don’t need to hold the buttons in for an extended amount of time. In fact, if you do that, nothing will happen. It’s a quick press.
Once you’re done, you’ll hear a camera shutter sound from your phone and a thumbnail preview of the screenshot will gently glide to the bottom corner of your screen.
How to Take a Screenshot on iPhone Using Siri?
You can use Siri to take a screenshot; due to the revised interface where Siri no longer takes up the entire screen once you recall it.
To use this function, just pull up Siri. You can do this using any of the following methods:
- Press and hold the Side button for a moment, on an iPhone without a Home button.
- Press and hold the Home button for a moment, if your iPhone has one.
- Say “Hey Siri”, if you’ve enabled this option under Settings > Siri & Search.
Once Siri appears, say “Take a screenshot.” Siri’s icon will disappear from the screen, then your phone will snap a screenshot.
How to Take a Screenshot on iPhone Using AssistiveTouch?
If you aren’t able to use the above methods; since you can’t press the buttons in the right way or one of your buttons isn’t working. An iOS accessibility feature called AssistiveTouch will help you to capture a screenshot.
This is a menu that allows you to perform certain actions if you have trouble touching the screen or using your phone’s buttons. However, it also comes in handy for replacing these actions if your iPhone’s Home button isn’t working.
To use AssistiveTouch, go to Settings > Accessibility > Touch > AssistiveTouch. Turn the AssistiveTouch slider on to enable it, and you’ll see a white dot appear on your screen. You can touch and drag this wherever you need to put it; tap to open it.
By default, you can double-tap the icon to take a screenshot. The screenshot command is also available under Device > More > Screenshot. However, since this isn’t very convenient, you can customize the menu to make snapping screenshots more accessible.
Tap Customize Top Level Menu to do so. Select one of the existing icons to replace it, or hit the Plus icon at the bottom-right to add a new one. From the list that appears, choose Screenshot to add it to the top menu.
Now, when you want to take a screenshot, tap the shortcut in AssistiveTouch to do so easily. The screenshot won’t show the AssistiveTouch icon.
How to Take a Screenshot on iPhone Using Back Tap?
Back Tap is another iOS 14 introduced feature. It lets you tap the back of your iPhone to activate certain actions, such as launching Spotlight or turning on the flashlight.
Gratefully, taking a screenshot is one of the supported options of Back Tap.
First, you need to enable Back Tap on your iPhone. Follow the steps below to do so:
- Open the Settings app and select Accessibility.
- Under the Physical and Motor section, tap Touch.
- Scroll down and select Back Tap.
- Tap Double Tap or Triple Tap and choose the action you want to set for it. You can set different actions for each of them.
Read more:
Apps
5 Best URL Shortener Services in 2024 [Free & Paid]
A URL Shortener is a technique in which a URL may be made shorter and still redirect to the original long page.
Most URL Shorteners are free and easy to use but come with limitations.
Google shut down its Google URL Shortener in 2018 with continued support until March 30, 2019. However, all existing links will continue to redirect to the intended destination.
Top URL Shortener Services on the Internet
1. Bitly.com
Bitly offers a free and enterprise version of its URL shortening service. No signup necessary, but creating an account allows you to manage links quickly and change the short link characters if you wish.
According to this Quora answer, the enterprise version of Bitly costs around $995/month.
Pro Tip: add + after the short link to access analytics of any bitly link. bitly.com/link+
2. TinyURL
A simple shortener that requires no sign-up and allows users to customize the keyword. The service is free to use, but there is no analytics.
3. Short.io
The best shorten link provider so far, it has so many useful features such as google analytics integration, bulk import, broken links detection, built-in analytics with so many details, link cloaking, and more.
Cost: affordable compared to similar solutions.
4. Rebrandly
Rebrandly is one of the popular URL shortener services in the market. It’s the most complete and reliable link management platform. Their solution provides the easiest way to create, measure, and manage short URLs with a custom domain name.
You can buy your domain name using Rebrandly, tag your URLs using UTM tagging, allow social media pixels to optimize for conversions, and more.
It’s expensive compared to other solutions.
5. eg.gd
eg.gd is a new URL shortener service that offers the same as rebrandly but for free. It was launched last year when bit.ly service was blocked in Egypt.
How To
How to include current URL in a Webflow form?
In the course of my professional endeavors, I consistently inquire about the origins of information, the methods by which our audience discovers us, and the roots of potential leads. These inquiries, among others, are integral to unraveling the complexities of the marketing funnel.
A commonplace challenge encountered by numerous marketers on a daily basis revolves around a pivotal question: which blog post proves most effective in generating leads and conversions?
If you have a blog on Webflow that includes a lead gen form or a newsletter form in all blog posts, when you receive an email from one of the forms – of course, you have to find out the URL of the respective page. This way, you can detect the top converting posts.
I’ve been searching for a solution here and there and finally found it. So, I thought to share it here.
How to automatically include the current URL in the webflow form?
- Add an embed code before the submit button of your lead generation form or any other form type – make it hidden, and insert the following code into it then save.
- The javascript code you need to make this work:
<script type="text/javascript"> window.onload=function() {document.getElementById('pageurl').value = window.location.href;} </script> <input type="hidden" id="pageurl" name="pageurl" value="pageurl" />
3. Once published, any new form submission will have a new column called “pageurl” so you can detect the source page of this submission.
Follow us for more Webflow hacks.
How To
Google’s E-E-A-T Principle Explained for SEO Success
In the ever-evolving world of digital marketing, staying ahead of the curve is paramount. One essential factor that often flies under the radar is Google’s E-A-T principle, which stands for Expertise, Authoritativeness, and Trustworthiness. This principle, now upgraded to E-E-A-T to include Experience, plays a pivotal role in enhancing website credibility and user experience.
In this article, we’ll delve into how understanding and implementing E-E-A-T can significantly influence your search engine rankings.
Unearthing the Essence of Google E-E-A-T
E-E-A-T is an acronym that encapsulates the qualities Google values when assessing the quality of online content. While it might not be explicitly mentioned in Google’s 200 known ranking factors, it holds undeniable significance in the eyes of quality raters and SEO professionals alike.
Expertise: Mastering Your Domain
Expertise is the cornerstone of E-E-A-T. It revolves around showcasing your in-depth knowledge and proficiency in your niche. To demonstrate your expertise effectively, consider these strategies:
1. Comprehensive Subject Mastery: Your content should reflect a deep understanding of your subject matter, leaving no room for ambiguity.
2. Credentials and Qualifications: Display relevant qualifications and credentials to bolster your credibility.
3. Proven Track Record: Highlight your past accomplishments and successes, as they can instill trust in your audience.
4. Research and Data: Stay updated with the latest research and trends in your field and back your content with accurate data.
5. Niche Specialization: Focus on a specific niche to establish yourself as an expert in that area.
6. Active Contribution: Contribute to your field by publishing content, and research papers, speaking at relevant events, or joining professional organizations.
Experience: Real-World Application Matters
Experience complements expertise by emphasizing practical, real-world application. To convey your experience effectively, consider these tactics:
1. Practical Application: Apply your knowledge in real-world scenarios and showcase your problem-solving skills.
2. Case Studies: Present real-world examples and results to illustrate your expertise in action.
3. Success Stories: Share stories of achievements or satisfied clients to instill confidence in your abilities.
4. Portfolio Display: For creative fields, such as design, art, or writing, showcase your previous work to demonstrate your experience.
5. Knowledge Demonstration: Stay updated with industry best practices, trends, and new developments, and share your insights through blog posts, articles, or speaking engagements.
6. Customer Testimonials: Positive testimonials from satisfied customers provide social proof of your expertise.
Authoritativeness: Building a Trustworthy Reputation
Authoritativeness centers on establishing your website as a reliable source of information within your niche. To enhance your authoritativeness, consider the following strategies:
1. Backlinks and Citations: Earn backlinks from authoritative websites in your industry, a strong signal of your website’s trustworthiness.
2. Awards and Recognition: Credible recognition, such as awards and certifications, contributes to your reputation.
3. Thought Leadership: Demonstrate authority through original research or innovative ideas, and engage in industry discussions.
4. Collaboration with Experts: Collaborate with recognized experts in your field through co-authored articles or speaking engagements.
5. Strong Social Media Presence: Engage with your audience on social media platforms to establish yourself as an authoritative figure.
6. Consistent, Relevant Content: Create high-quality content consistently to build credibility with users and search engines.
Trustworthiness: The Bedrock of Credibility
Trustworthiness is the final piece of the E-E-A-T puzzle, focusing on the credibility of your website’s information. To foster trustworthiness, adhere to these guidelines:
1. Transparency: Be transparent about your brand, contact details, business operations, and the purpose of your content.
2. Provide Accurate Information: Ensure your content is factually correct and up-to-date, and avoid misleading practices.
3. Ethical Practices: Follow ethical guidelines, respect user privacy, handle sensitive data responsibly, and comply with relevant laws.
4. User Experience and Security: Create a positive user experience and prioritize website security with HTTPS connections.
5. Customer Testimonials and Reviews: Genuine testimonials from satisfied customers bolster your website’s trustworthiness.
6. Customer Support: Offer prompt and helpful customer support to engage with your audience effectively.
7. Disclosure of Affiliations: Clearly disclose any affiliations or sponsorships that might impact your content.
While Google’s Quality Rater Guidelines may not explicitly mention E-E-A-T, adhering to these principles can significantly improve your website’s credibility and user experience. Remember, achieving higher SERP rankings requires a holistic approach, and understanding and implementing E-E-A-T is a valuable piece of the puzzle.
If you need expert guidance, consider enlisting the support of professional SEO services to help you navigate this ever-changing landscape.
-
Startups9 years ago
3 Creative Egyptian Women Who Master E-commerce
-
News10 years ago
11 Talented Egyptian Photographers on Instagram
-
Campaigns8 years ago
Vodafone Egypt Brings Generations Together, Unlocks 4G Power
-
Marketing9 years ago
Which categories will suffer most from increased prices in Egypt?
-
Apps8 years ago
Radio Garden Live Map of The Globe’s Radio Stations
-
News8 years ago
Top 10 Egyptian Fashionistas to Follow on Instagram
-
Campaigns8 years ago
7 Big Stats That Show Which Ramadan Advertisements Resonated Most
-
Opinion9 years ago
F*** Being a Founder, Be a Follower