![Develop User Persona Using Google Analytics, Facebook Insights [Guide]](https://adigitalboom.com/wp-content/uploads/2016/12/define-user-persona-min-696x467.png "define-user-persona-min")
You’ve probably heard fellow marketeers tell you before that developing your marketing digital persona (Also referred to as user persona, customer persona, or buyer persona) is the first and most important thing you have to do before you begin marketing a product or a service, and I’m sure you’ve even given it a try, only to realize that it’s not as easy as you thought it would be.
If you read about the process, you’ll either go through articles vaguely explaining the process, or articles telling you to send out surveys, build focus groups, and call/email your customers, but those somewhat traditional methods don’t always work out.
Some customers are too busy to answer an email or fill out a survey, some simply don’t care enough about your business to do so, some are embarrassed to answer certain questions or could answer them dishonestly.
Luckily however, if you have a digital business, you already have access to a wealth of data that you can use.
But, before we start, let’s answer the following:
- What’s my persona’s name? How do they look like? How old are they? Are they male or female? Where do they live? What’s their relationship status?
- Is my persona a business owner, a student, or an employee? If it’s the latter, what do they do for a living? What are their seniority level within his company?
- What’s important for my persona? What motivates them to buy products/services? What are their goals in life? And what’s stopping them from achieving those goals?
- What are the best marketing channels to engage them? What tone of voice should be used with them?
This step by step guide will use a combination of Google Analytics and Facebook Insights. If you’ve got the time and want to go further, you can always source more data from tools like Twitter Analytics, Facebook Page Analytics, Adwords Remarketing lists, Google Search Console, or any other analytical tool you might be using.
Step 1: Set up Google Analytics, and let it run for a month
If you don’t have Google Analytics set up yet, you won’t be able to get any value out of this guide. Go set it up, test that it works fine and that it’s collecting data properly. If you’ve already went through this, skip to step 2, if not, read on.
Head on over to Google Analytics, register for an account, and follow the sign up procedure, you’ll be required to provide your business name, URL, timezone, business category, and answer a bunch of other questions.
You’ll then be required to prove to Google Analytics that this is, in fact, your website, there are a number of ways you can verify this, if you have Google Tag Manager set up, you’ll be able to do this without having to play around your website’s code, otherwise, you’ll be required to copy/paste GA’s tracking code that’s provided to you, into each and every page header on your website. You might need to get the help of your webmaster here.
Once the above is done, your Google Analytics will come to life. Make sure you set up your Google Analytics goals now, you can find those under Admin> Goals> New Goals.
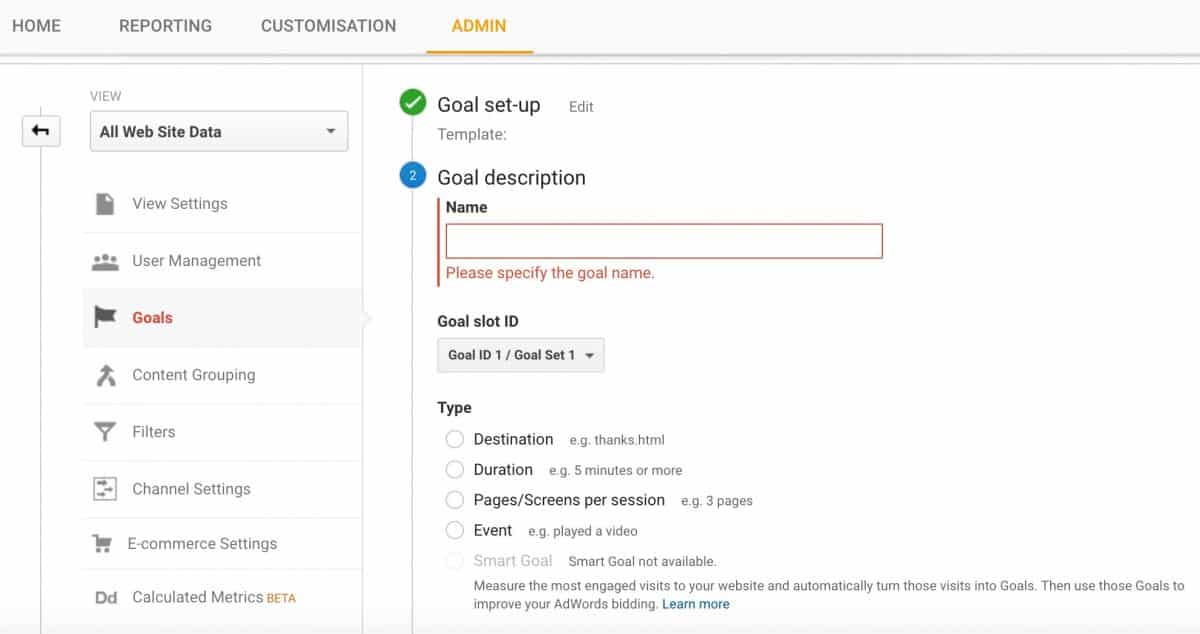
You might want to spend a bit of time here figuring out what your goals are.
For instance, if you’re the owner of a content website, you might want to track users who spend 2+ minutes of time on a specific content piece, or track email newsletter sign ups, but if you’re an eCommerce platform, tracking purchases/checkouts is probably your number one priority.Another thing we need to check, is whether we are collecting demographic data or not, this is disabled by default, so if you haven’t already, you need to enable it by going to Admin> Property> Property Settings, and then checking ‘Enable Demographics and Interest Reports.’

Step 2: Begin user segmentation on Google Analytics
Now it’s time to break down your audience into its most obvious and common denominators; age groups, gender, and country traffic is generated in. We’ll then look into who’s a customer and who isn’t, and the behavior of each group on our website.
To start, on Google Analytics, go to Reporting> Audience> Demographics> Age, then pick “Gender” as your secondary dimension. You should be seeing a 12 row table (6 Female & 6 Male) for different age groups (18–24, 25-34, 35–44, 45–54, 55–64, & 65+).
On the same table, you’ll find many columns for Acquisition, Behavior, & Conversions. Keep what you need and what’s important to you, then export the entire thing into Excel or Google Sheets to be able to properly examine the numbers.
Ensure that you have data for all the goals that you’ve set up and not just the default goal or the ‘All Goals’ tab. If it’s important enough for you to have it as a goal, then you’d want to look at the persona most actively accomplishing this goal.
Also, ensure that the duration set for data collection is long enough to avoid being deceived by trendy or unusual activities on your website, I usually look at a 90 day duration when developing personas, however, if you’ve had a major change on your website that would change results one way or another, you should wait until those changes are out of the scope of your duration.

Look at your exported table, remove and add data columns as you see fit. Then take a long and hard look at your numbers and try to understand them, then figure out what segments you’d want to study further.
Now say you have an eCommerce platform that sells glasses in Jordan, Palestine, and Saudi Arabia, you would need three of the above mentioned tables for each country. Finally, you should end up with broad groups/segments such as “Male users browsing my website in Saudi Arabia, between the ages of 18 and 24”.
Let me point as well that the above is not set in stone, you might want to segment your audience differently, if your website is new and you’re not getting enough traffic, you’ll probably end up with broader groups, and if you’re managing a high traffic website, you might want to go with even tighter segments. Do what YOU see is best for your business!
Step 3: Build a segment out of each group above, and look into it further
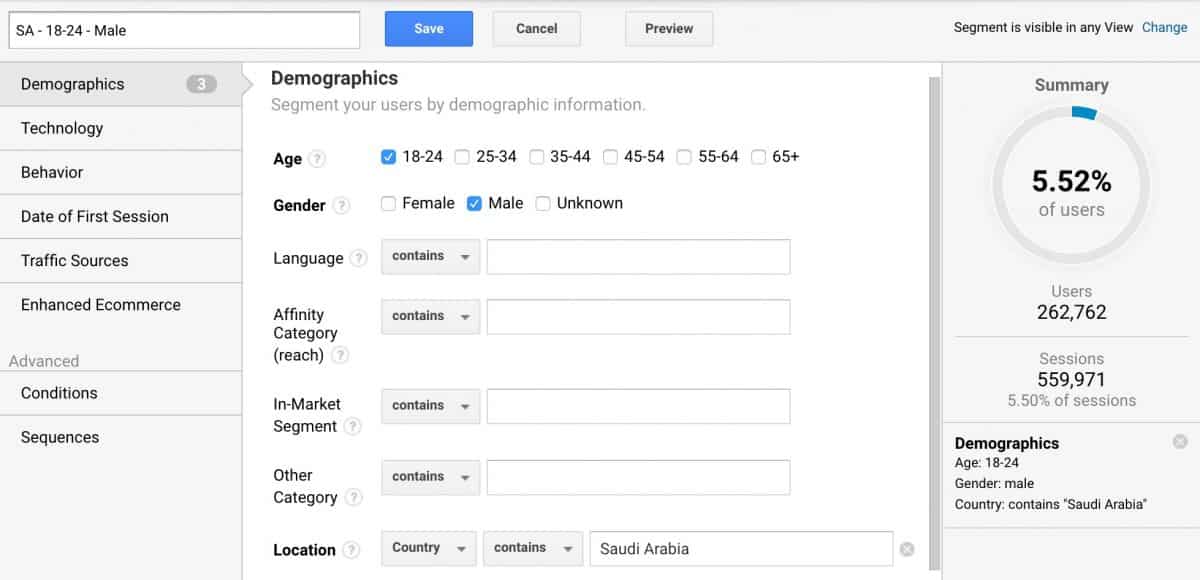
Go to user segments (Default is ‘All Users’), and create custom segments for the ones you want to study, fill out the age group, language, gender, and location.
Look at what you have now, and try to put yourself in the shoes of each one of those groups (In fact, go a mile in their shoes, take your time here), try to understand their behavior. Go through the entire navigation menu on Analytics left side, do a content drill down, and try to gather as much information as possible. Keep track of everything, take notes, you’ll need them soon enough.
Now, does one group of users come too often to your website, with a pageviews per session and time on site higher than average, yet, lower conversion? Well, they could be more interested in your blog content than they are in buying from you, or might be leaving because your products are too expensive, or perhaps they’re confused by your checkout process. Do the above over and over again, focus and look at everything, and redo this for every group of users you want to build a persona for.
Pro Tip: If you can’t make sense of their behavior, you might want to consider installing a mouse tracking software to watch in real time what they’re doing on website, you might find usability issues that you did not know about.
You should be able by now, to expand on your description of the group from step 2, you’ll have something like “Male users visiting my website, from Saudi Arabia, between the ages of 18 and 24, + Mostly speaking one language, and mostly come through mobile devices (70% of which come through Android devices with Android 4.0 or older), use the search functionality on my website often to land into products, and don’t checkout as often as other groups”.
What does this mean? Perhaps they’re middle class, young, male users with a moderate degree of education, who are after a specific product (Hence, the search functionality), and do not seem to be able to checkout. Perhaps the price is too high for them, perhaps they don’t have access to a credit card being relatively young, or maybe they’re still in the consideration phase and are doing their research to see which platform offers the best price.
Step 4: Look up the above segments on Facebook Insights
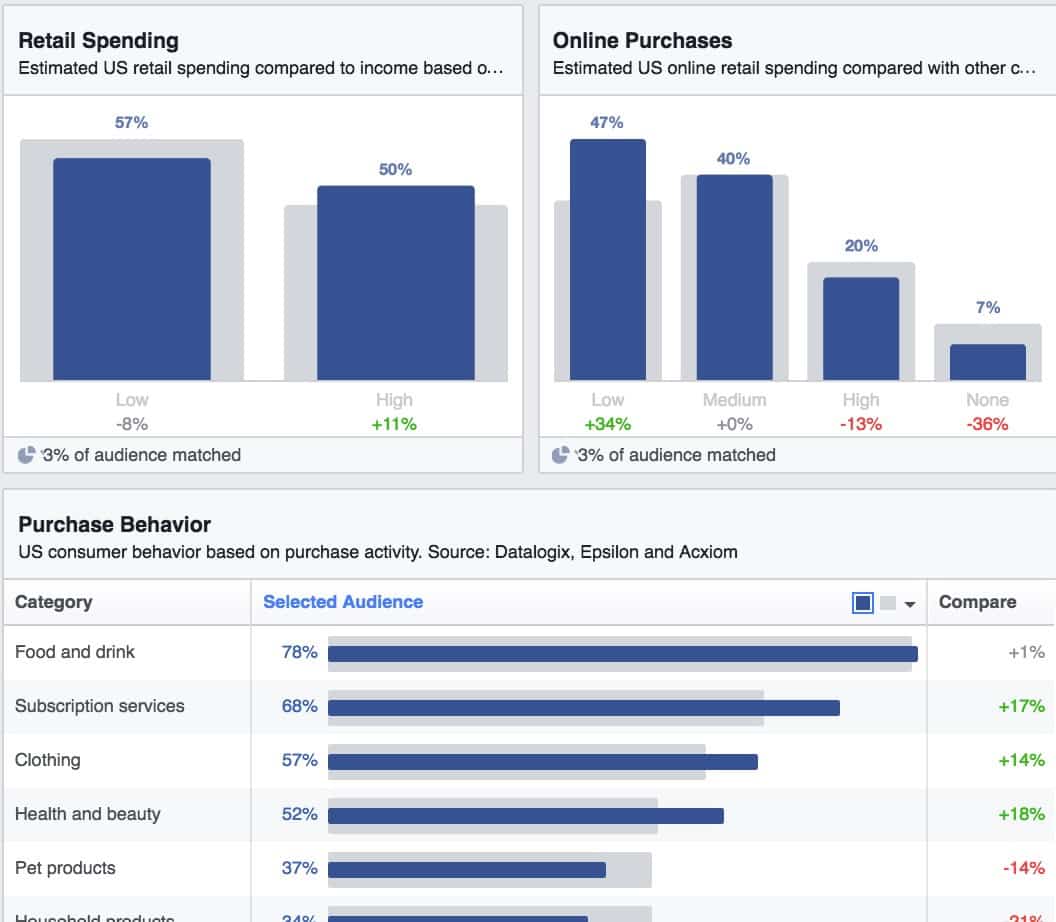
You’re almost there. With the above, you already understand where those groups of people who buy (Or use your service) are from, how old they are, how much do they spend on our products usually, and how do they behave on our website. But, who are they really? Are they sports fans, do they follow technology? If they are, are they Apple fans or Microsoft fans? Are they rockers or hip hop fans? Do they tend to use Facebook heavily?
All of the above can be understood through Facebook Insights, even if you don’t have access to your page, or if you don’t have a page to begin with. You get to fill the information you got from step 3 into Facebook insights and learn about your persona’s lifestyle, income range, job titles, pages they like, and much more.
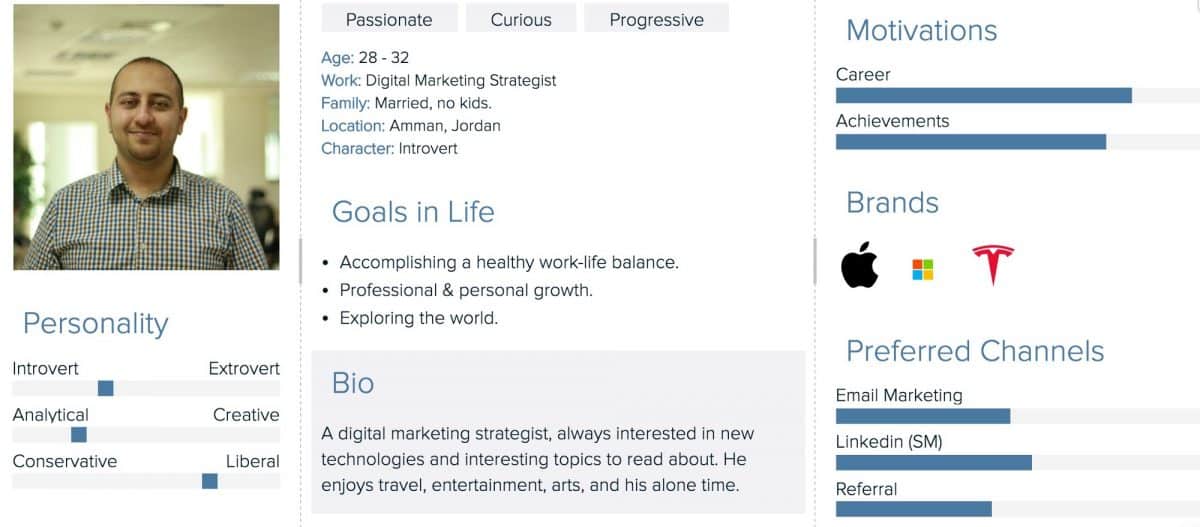
Take all of this, add it to the information you already know, and you’re there! You’ll have enough information to be able to build a persona.
Now comes the fun part, give your persona a name and a bit of character, print out all of your personas and attach them to the wall in front of your office, you’ll find yourself looking at them more and more whenever you’re about to make a marketing decisions.
I understand that the above is by no means conclusive, it only accounts for your current users/customers and not your potential ones.
And just like life, if you put people into boxes, you’ll lose track of the small boxes, those may be your biggest fans and advocates but are not big enough of a group to be considered, but we have to start somewhere, and this approach will give you a close enough idea on who your personas are.
Let me know if there’s anything you’d add to this approach.


