Connect with us

How To

10 hidden settings in iOS 16 that you need to try today

Published

on

10 hidden settings in iOS 16 that you need to try today

Apple has recently released iOS 16, exposing users to valuable and enjoyable features adding more privacy, and improving the overlook and the user experience.

However, some users may find the new settings added by iOS 16 annoying rather than delighting, and in this article, we show how to turn these off. Meanwhile, some highly welcome new options that are deactivated by default, and we’ll also show you how to turn these on.

You’ll enjoy all iOS 16’s updates and options with these ten settings:

1. Show the battery percentage indicator

With the launch of iOS 16, Apple returned the battery percentage indicator taken from the iPhone’s status bar in 2017. But you have to choose to turn it on precisely. Step-by-step guide.

Step-by-step to enable the battery percentage indicator

Go to Settings > Battery and tap the toggle labeled Battery Percentage. A number will be superimposed over the battery icon at the top of the screen–if your iPhone supports the feature.

However, Apple has confirmed that users of older generation iPhone models will miss out on the ability to show their ‌iPhone‌’s battery percentage directly in the status bar.

Apple says that the new battery percentage display is unavailable on the ‌iPhone‌ XR, iPhone 11, the iPhone 12 mini, and the iPhone 13 mini. Apple provides no additional information about why these devices will miss out on the new feature.

2. Turn off the search button

On an iOS 15 home screen, you’ll see a little icon between the dock and the other app icons. It shows a row of dots indicating how many home screens you’ve got and which one you’re on. Once you update to iOS 16, this icon is replaced by a Search icon, duplicating the Spotlight function accessed by swiping down on the Home screen.

iOS 16: 10 super settings you need to change in your iPhone

Image Credit: Foundry

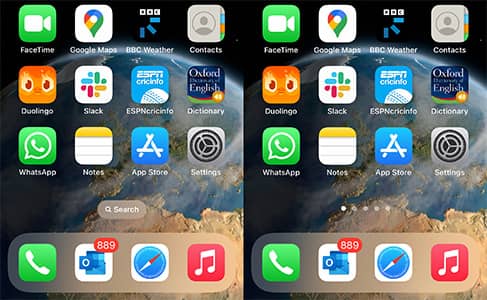
Step-by-step to turn off the search button

If you find this unnecessary and/or distracting, you can revert to the dots by going to Settings > Home Screen and tapping the toggle labeled Show on Home Screen under Search.

3. Turn on the haptic keyboard setting

Most of us turn off the iPhone’s keyboard sounds, which can be irritating when typing out long messages in public. But doing this means you miss out on the helpful haptic feedback that helps with typing accuracy.

In iOS 16, Apple finally gives an option to turn on haptic keyboard feedback without keyboard clicks, which is both discreet and valuable and thus combines the best of both worlds.

iOS 16: 10 super settings you need to change in your iPhone

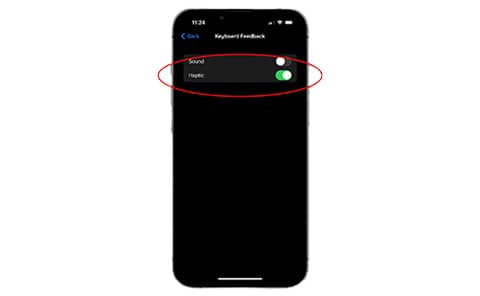
Step-by-step to turn on the haptic keyboard setting

Go to SettingsSounds & Haptics > Keyboard Feedback and flip the Haptic toggle green.

4. Give yourself more time to unsend emails

As iOS 16, Mail lets you unsend emails within a specific time limit. But the odd thing is that the time limit is up to you–to a degree.

Step-by-step to increase the time to recall emails

The feature is set to 10 seconds by default, but if you go to Settings > Mail > Undo Send Delay, you can change it to 20 or 30 seconds. Still, not much time to panic and change your mind, but every extra second helps in an email emergency.

5. Stop accidentally ending calls

Many iPhone owners will have experienced the inconvenience of accidentally pressing the side button during a phone call. By default, this action will end the call—but in iOS 16, Apple adds a new option that lets you change that.

Step-by-step to prevent Lock to End Call

Go to Settings > Accessibility > Touch and tap the toggle labeled Prevent Lock to End Call. Just remember you’ve changed this, or you might get caught saying rude things about the person you thought you just hung up on.

6. Hands-free hang-ups

While we’re talking about hanging up on calls, there’s a new feature in iOS 16 that lets you do this using Siri–which makes life a lot easier if you’re talking hands-free through the speaker. You just need to say, “Hey Siri, hang up.”

Step-by-step to enable hands-free hang-ups

To activate this option, go to Settings > Siri & Search > Call Hang-up, and tap the toggle, so it turns green.

7. Send messages without confirmation

Here’s another Siri time-saver: when sending messages using Siri, you can now skip the confirmation step.

Step-by-step to automatically send messages without confirmation

Go to SettingsSiri & Search > Automatically Send Messages, tap the toggle, so it turns green, and Siri will know not to bother asking you to confirm.

8. Share (some of) your Focus Statuses

iPhone users had access to multiple Focus modes in iOS 15, but iOS 16 heavily expands this feature. One change is greater control over the sharing of status information: it’s much easier now to audit and control the specific modes that are shared and those that are not.

iOS 16: 10 super settings you need to change in your iPhone

Image Credit: Foundry

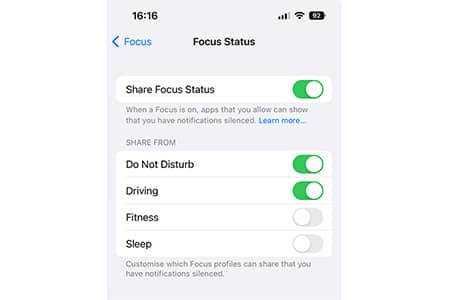
Step-by-step to share focus status across devices

Go to Settings > Focus, and make sure that Share Across Devices is set to on. You can now tap Focus Status and pick and choose which modes, if any, will be synced.

We found that all modes were set to share by default, but you might not want everyone to know that you’re asleep, for example, or working out.

Finally, note that this sharing permission still only applies on a per-app basis. Go to SettingsMessages, for example, and you can toggle Allow Messages To Access Focus on and off.

9. Fine-tune your notifications

Apple has changed how notifications display on the lock screen, with those from the same app organized under what Apple calls the Stack view. This view is enabled by default, but those who’d prefer to use the old method can go back if they’d prefer.

Apple has changed the way that notifications display on the lock screen, with those from the same app organised together under what Apple calls the Stack view. This view is enabled by default, but those who’d prefer to use the old method can go back if they’d prefer.

Image Credit: Foundry

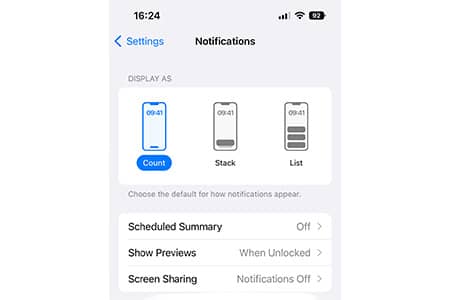
Step-by-step to fine-tune notifications on iPhone

Go to SettingsNotifications and select List at the top to revert to the iOS 15 notifications style. Or pick Count if you’d rather not see the notifications and just get an unobtrusive number at the bottom of the screen.

Note: The Count view is the least stressful, although you may miss some emails.

10. Stop your photos from popping up unexpectedly

iOS 16 adds a cute AI-based feature that finds what it thinks are significant photos and videos and pops them up in various places (widgets, search, the For You tab in Photos, and so on) as a reminder of happy memories. This is a charming feature, but it’s not for everyone–particularly if you’ve got embarrassing photos on your phone or just don’t want people on the train peering at your vacation pics.

Step-by-step to stop photos from popping up unexpectedly

You can turn off this feature by going to Settings > Photos and then tapping the Show Featured Content toggle, so it turns light gray.

Apps

5 Best URL Shortener Services in 2024 [Free & Paid]

Published

on

The 5 Best URL Shorteners 2020

A URL Shortener is a technique in which a URL may be made shorter and still redirect to the original long page.

Most URL Shorteners are free and easy to use but come with limitations.

Google shut down its Google URL Shortener in 2018 with continued support until March 30, 2019. However, all existing links will continue to redirect to the intended destination.

Top URL Shortener Services on the Internet

1. Bitly.com

Bitly offers a free and enterprise version of its URL shortening service. No signup necessary, but creating an account allows you to manage links quickly and change the short link characters if you wish.

According to this Quora answer, the enterprise version of Bitly costs around $995/month.

Pro Tip: add + after the short link to access analytics of any bitly link. bitly.com/link+

2. TinyURL

A simple shortener that requires no sign-up and allows users to customize the keyword. The service is free to use, but there is no analytics.

3. Short.io

The best shorten link provider so far, it has so many useful features such as google analytics integration, bulk import, broken links detection, built-in analytics with so many details, link cloaking, and more.

Cost: affordable compared to similar solutions.

4. Rebrandly 

Rebrandly is one of the popular URL shortener services in the market. It’s the most complete and reliable link management platform. Their solution provides the easiest way to create, measure, and manage short URLs with a custom domain name.

You can buy your domain name using Rebrandly, tag your URLs using UTM tagging, allow social media pixels to optimize for conversions, and more.

It’s expensive compared to other solutions.

5. eg.gd

eg.gd is a new URL shortener service that offers the same as rebrandly but for free. It was launched last year when bit.ly service was blocked in Egypt.

Continue Reading

How To

How to include current URL in a Webflow form?

Published

on

How to include current URL in a Webflow form?

In the course of my professional endeavors, I consistently inquire about the origins of information, the methods by which our audience discovers us, and the roots of potential leads. These inquiries, among others, are integral to unraveling the complexities of the marketing funnel.

A commonplace challenge encountered by numerous marketers on a daily basis revolves around a pivotal question: which blog post proves most effective in generating leads and conversions?

If you have a blog on Webflow that includes a lead gen form or a newsletter form in all blog posts, when you receive an email from one of the forms – of course, you have to find out the URL of the respective page. This way, you can detect the top converting posts.

I’ve been searching for a solution here and there and finally found it. So, I thought to share it here.

How to automatically include the current URL in the webflow form?

  1. Add an embed code before the submit button of your lead generation form or any other form type – make it hidden, and insert the following code into it then save.
  2. The javascript code you need to make this work:
<script type="text/javascript"> window.onload=function() 
{document.getElementById('pageurl').value = window.location.href;} </script> 
<input type="hidden" id="pageurl" name="pageurl" value="pageurl" />

3. Once published, any new form submission will have a new column called “pageurl” so you can detect the source page of this submission.

Follow us for more Webflow hacks.

(more…)

Continue Reading

How To

Google’s E-E-A-T Principle Explained for SEO Success

Published

on

Demystifying Google's E-A-T Principle for SEO Success

In the ever-evolving world of digital marketing, staying ahead of the curve is paramount. One essential factor that often flies under the radar is Google’s E-A-T principle, which stands for Expertise, Authoritativeness, and Trustworthiness. This principle, now upgraded to E-E-A-T to include Experience, plays a pivotal role in enhancing website credibility and user experience.

In this article, we’ll delve into how understanding and implementing E-E-A-T can significantly influence your search engine rankings.

Unearthing the Essence of Google E-E-A-T

E-E-A-T is an acronym that encapsulates the qualities Google values when assessing the quality of online content. While it might not be explicitly mentioned in Google’s 200 known ranking factors, it holds undeniable significance in the eyes of quality raters and SEO professionals alike.

Expertise: Mastering Your Domain

Expertise is the cornerstone of E-E-A-T. It revolves around showcasing your in-depth knowledge and proficiency in your niche. To demonstrate your expertise effectively, consider these strategies:

1. Comprehensive Subject Mastery: Your content should reflect a deep understanding of your subject matter, leaving no room for ambiguity.

2. Credentials and Qualifications: Display relevant qualifications and credentials to bolster your credibility.

3. Proven Track Record: Highlight your past accomplishments and successes, as they can instill trust in your audience.

4. Research and Data: Stay updated with the latest research and trends in your field and back your content with accurate data.

5. Niche Specialization: Focus on a specific niche to establish yourself as an expert in that area.

6. Active Contribution: Contribute to your field by publishing content, and research papers, speaking at relevant events, or joining professional organizations.

Experience: Real-World Application Matters

Experience complements expertise by emphasizing practical, real-world application. To convey your experience effectively, consider these tactics:

1. Practical Application: Apply your knowledge in real-world scenarios and showcase your problem-solving skills.

2. Case Studies: Present real-world examples and results to illustrate your expertise in action.

3. Success Stories: Share stories of achievements or satisfied clients to instill confidence in your abilities.

4. Portfolio Display: For creative fields, such as design, art, or writing, showcase your previous work to demonstrate your experience.

5. Knowledge Demonstration: Stay updated with industry best practices, trends, and new developments, and share your insights through blog posts, articles, or speaking engagements.

6. Customer Testimonials: Positive testimonials from satisfied customers provide social proof of your expertise.

Authoritativeness: Building a Trustworthy Reputation

Authoritativeness centers on establishing your website as a reliable source of information within your niche. To enhance your authoritativeness, consider the following strategies:

1. Backlinks and Citations: Earn backlinks from authoritative websites in your industry, a strong signal of your website’s trustworthiness.

2. Awards and Recognition: Credible recognition, such as awards and certifications, contributes to your reputation.

3. Thought Leadership: Demonstrate authority through original research or innovative ideas, and engage in industry discussions.

4. Collaboration with Experts: Collaborate with recognized experts in your field through co-authored articles or speaking engagements.

5. Strong Social Media Presence: Engage with your audience on social media platforms to establish yourself as an authoritative figure.

6. Consistent, Relevant Content: Create high-quality content consistently to build credibility with users and search engines.

Trustworthiness: The Bedrock of Credibility

Trustworthiness is the final piece of the E-E-A-T puzzle, focusing on the credibility of your website’s information. To foster trustworthiness, adhere to these guidelines:

1. Transparency: Be transparent about your brand, contact details, business operations, and the purpose of your content.

2. Provide Accurate Information: Ensure your content is factually correct and up-to-date, and avoid misleading practices.

3. Ethical Practices: Follow ethical guidelines, respect user privacy, handle sensitive data responsibly, and comply with relevant laws.

4. User Experience and Security: Create a positive user experience and prioritize website security with HTTPS connections.

5. Customer Testimonials and Reviews: Genuine testimonials from satisfied customers bolster your website’s trustworthiness.

6. Customer Support: Offer prompt and helpful customer support to engage with your audience effectively.

7. Disclosure of Affiliations: Clearly disclose any affiliations or sponsorships that might impact your content.

While Google’s Quality Rater Guidelines may not explicitly mention E-E-A-T, adhering to these principles can significantly improve your website’s credibility and user experience. Remember, achieving higher SERP rankings requires a holistic approach, and understanding and implementing E-E-A-T is a valuable piece of the puzzle.

If you need expert guidance, consider enlisting the support of professional SEO services to help you navigate this ever-changing landscape.

Continue Reading

Trending