If you take frequent screenshots on your Mac, knowing the right keyboard shortcuts and how to manage screenshot settings can streamline your workflow. This guide covers all Mac screenshot shortcuts, including how to change where screenshots are saved.
More like this: How to screenshot on an iPad?
Mac Screenshot Shortcuts
Capture the Entire Screen
Command + Shift + 3
This shortcut takes a screenshot of your full display and saves it to your default location.
Capture a Selected Area
Command + Shift + 4
This changes your cursor to a crosshair so you can select a portion of your screen. Drag to highlight the area, then release the mouse or trackpad to capture it.
Extra Controls with Command + Shift + 4:
Tap the spacebar after pressing the shortcut to turn the crosshair into a camera icon. Hover over any window and click to capture it with a shadowed border.
Hold the spacebar after dragging (but before releasing) to lock the size of your selection while allowing you to reposition it.
Hold the Shift key after dragging (but before releasing) to lock the top and sides of your selection. This lets you move only the bottom edge. To toggle control between edges, release and press the Shift key again without letting go of the mouse.
Use the Screenshot Toolbar
Command + Shift + 5
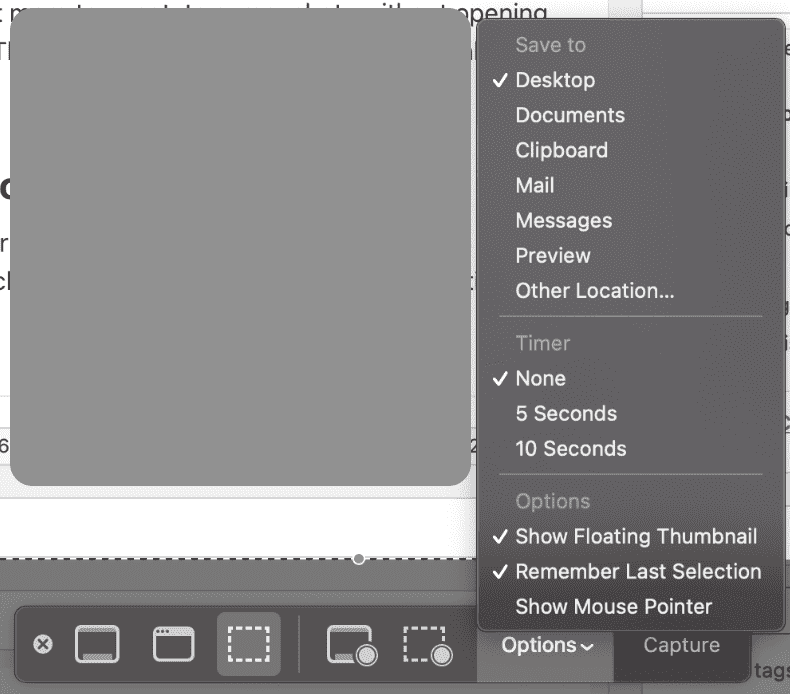
This opens the screenshot panel introduced in macOS Mojave. You’ll see options to capture the entire screen, a window, or a selected portion. You can also record video of your screen.
Click the Options button to choose where your screenshots are saved. Default choices include Desktop, Documents, Clipboard, Mail, Messages, and Preview. You can also select “Other Location” to set a custom folder.
You can adjust the timer, enable or disable the mouse pointer, and toggle the Floating Thumbnail preview.
If the toolbar gets in your way, click and drag it to reposition.

Screenshot the Touch Bar (If Available)
Command + Shift + 6
On MacBook Pro models with a Touch Bar, this shortcut captures a screenshot of the Touch Bar itself.

Quick Markup and Floating Thumbnail
After taking a screenshot, a small thumbnail appears in the lower-right corner of your screen. Clicking it opens Markup View, where you can annotate your image. You can also swipe it away or let it disappear automatically.
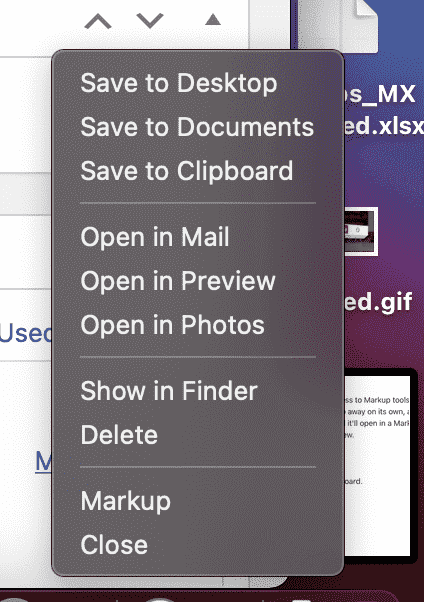
Right-clicking the thumbnail gives you more options:
-
Save to Desktop, Documents, or Clipboard
-
Open in Mail, Messages, Preview, or Photos
-
Show in Finder
-
Delete or close the preview
This feature lets you handle screenshots without opening a separate app.

How to Change Screenshot Save Location on Mac
If you’re using macOS Mojave or later, press Command + Shift + 5, click Options, then choose Other Location to select a new destination folder. Your Mac will continue saving screenshots there until you change it again.
If Command + Shift + 5 isn’t working, you will need to enable it by following this path: System Settings → keyboard shortcuts → Choose Screenshots from left sidebar → check the box for “screenshot and recording options.

Related Guides
How to Take a Screenshot on iPhone?


