Unlike Skype, Zoom, Whatsapp, or any chat app, Discord has become an invaluable tool for users in the past two years providing a seamless place to communicate over text and voice in a world where people from various communities spend their time hanging out on it for different purposes.
What is Discord?
Here is all that you need to know about Disord. So, let’s get started!
In 2015 Discord was first launched to easily communicate while playing PC games together. About 70% of active Discord users in 2020 reported that they use the platform for nongaming purposes or a mix of gaming and everyday use.
In 2021, Discord heavily expanded moderator tools with expanded server roles, more automation, easier bot integration, and a timeout feature.
In 2022, it’s clear Discord doesn’t belong to gamers anymore.
The service allows users to create servers, which can consist of a variety of text and voice channels with high-quality features.
Discord lets you do the following by making a free account:
- Chat in high-quality, low-latency voice channels for an unlimited amount of time
- Send instant messages to friends or groups of friends
- Stream HD video capture from your computer or phone, also low-latency and unlimited
- Watch multiple streams at once with individual volume sliders
- Organize servers with communities of thousands
- Talk in group video calls
- Share small-ish files with friends
- Add bots to servers that add new functionalities, like a group radio
What are Discord Servers?
A “Discord server” is a place on Discord for groups of all sizes to talk in. But that doesn’t explain what makes a server special.
In fact, that’s what a lot of Discord servers are about — people come from all sorts of different corners of the world, but no matter the distance, they can get together on Discord and talk about anything they’d like with whoever they want.
You can chat with your friends without feeling lost in the many conversations going on at once for free!
How do you start a Discord server?
First, download the app for your computer or smartphone at discord.com/download. Alternatively, you can access Discord on any computer you can use a web browser on, without downloading an app, at discord.com/login.
Once your account is set up and you’re signed in, you’ll see a green + (Plus) button on the left side of the app. Choose that, and you’re on your way to making a new home.
You’ll then be asked what the server’s about. You’ll be given a different set of starter channels to talk in depending on your answer. More on what channels are later.
For example, we’ll use the “Friends” template, but feel free to pick which one works best for you.
Next, the most critical part of any server or group: The name. No matter what our friend group chats about, we all have one thing: we love houseplants. Let’s call it… “Plant Pals.”
If anything ever happens or you’ve left the houseplant lifestyle for greener, you can always change the server name and icon later on.
You’re done! Your new server for you and your closest friends is ready to roll. But it’s missing something important… your friends!
How can you invite friends to your new server?
In the middle of the chat window, you should see a big “Invite Your Friends” button. Hit that, and you’ll see the option to either invite your friends directly or share an invite link.
You can always invite friends through the “Invite” button in the server’s drop-down menu on the top-left if it’s not there.
After inviting friends and sharing your invite link, soon, everyone will be gathered in your new home!
Pro tip: You can also invite your friends by creating a custom link when you unlock the last Perks Package in your server boost.
Differences between ‘Text Channels’ and ‘Voice Channels’?
You’ll see a few lists in your new server called “Text Channels” and “Voice Channels.” These are where you and your friends will be talking in various ways.
Text channels behave similarly to how you may send messages on other platforms. They’re where you send messages to your friends, share photos, files, or one song stuck in your head. You can even type out someone’s using name starting with an “@,” and they’ll be notified, such as “@Fern.”
Every channel has a name associated with it and holds its chat history. You can think of a channel name as the conversation topic for that channel. For example, in a text channel named #general, you’ll talk about anything and everything on your mind, while a channel called #plant-talk could be best suited for showing off that newest ficus.
By default, when you make a new channel, everyone will be able to see and post on it. It’s like making a new group to talk in without having to re-add everyone again like you would in a regular chat group.
Voice channels are part of what makes Discord special. The Discord server is like having all your friends over. Voice channels are what make this possible.
Click on a voice channel, and you’re placed in a room to talk with your device’s microphone. It’s like walking into a room with your friends and joining their conversation! Unlike Direct Messages, users in a server won’t be startled by a ringtone when they enter the voice channel.
Voice channels also allow you to use your device’s camera to see your friends for a video chat. You can also share your device’s screen to show your friends how good you got on that one game or how complex your plant watering schedule is.
You can have unlimited people in a voice call at once, and up to 25 people video chat simultaneously. Up to 50 people can watch someone’s shared screen.
How can you add or remove new channels?
When we made our “Plant Pals” server, the “Friends” template we used included channels called #general, #gaming, and #music. Since we’re big into houseplants, our friends want a place where we can focus on talking about and sharing tips on taking care of our plants. So, let’s make a channel for that!
To make a new channel, head into your server’s drop-down menu on the top-left and select “Create Channel.” It’s the same menu you used to make an invite! If you’re on mobile, slide to the right to open your channel list, tap the server’s name and choose “create a channel.”
Making a new channel is as easy as typing up a name!
From there, a menu pops up, letting you customize your channel. We’ll be making a text channel for this, so choose “Text Channel” and give it a name. Let’s keep it simple and call it “#plants.”
How many channels should you have?
When creating more channels, it’s best not to get crazy with the channels — if you’re starting with your server, you’ll want to get a feel for how your friends use them. To keep things comfy without overwhelming others, It’s recommended to start with a small number of channels and adjust your channel selection as time goes on.
Let’s think about our new #plants channel: “plants” itself is a broad subject that can result in many different topics to discuss. Specific conversations, such as “what pot should this fern be in?” will likely be addressed, answered, and moved on after a short period. There’s no need to make a whole channel called #what-pot-should-this-fern-be-in.

Servers can be pretty flexible — you can always add a new channel when you want, and you won’t have to reinvite your friends each time you make a new channel.
You can also delete channels when you don’t need them anymore, but once a channel is deleted, everything within it is gone for good. Be sure to make 100% certain you want to delete the contents of a channel before it’s gone — sometimes, keeping an unused channel around is better than deleting it outright.
Can you limit channels to just a few friends?
Yes, you can! To help, you can designate a channel to be only a Private channel, only accessible to specific members and roles you decide. Roles can be powerful tools for larger servers, so we’ll stick to specifying precisely who we want within our small friend’s server.
As you’re making a channel, you’ll see an option to create a Private channel. Toggle that on, and hit Next.
Specify who should see the channel, and hit “Create” Channel! You’ll see a brand new channel pop up, and if it’s a Text Channel, a list of the members who can see it.
Suppose someone ever wants to be added or removed from a private channel after it’s already been made. In that case, you can right-click on the channel (or long-press on mobile), select “Edit Channel,” and head to Permissions, where you can adjust who can see that particular space.
Now You’ve got a unique home for your closest friends! How wonderful is that!
Now that you’re all set up in your server keep going and have fun! Feel free to hang out in a voice channel, post adorable photos, or wave hi to each other in a video call, no matter where you may be.
Your server is your private home; you can share whatever you like with whoever you want!
How to make the best of Discord using “Server Boost”?
Discord is a free-to-use app. However, if you want to dig deep and extract the treasure of your server, Discord has something called “Server Boost” where a server unlocks many extra/pro features including:
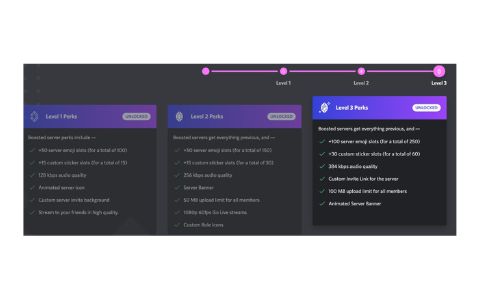
Level 1 Perks
- +50 server emoji slots (for a total of 100)
- +15 custom sticker slots (for a total of 15)
- 128 kbps audio quality
- Animated server icon
- Custom server invites background
- Stream to your friends in high quality
Level 2 Perks
- Boosted servers get everything previous, and —
- +50 server emoji slots (for a total of 150)
- +15 custom sticker slots (for a total of 30)
- 256 kbps audio quality
- Server Banner
- 50 MB upload limit for all members
- 1080p 60fps Go Live streams
- Custom Role Icons
Level 3 Perks
- Boosted servers get everything previous, and —
- +100 server emoji slots (for a total of 250)
- +30 custom sticker slots (for a total of 60)
- 384 kbps audio quality
- Custom Invite Link for the server
- 100 MB upload limit for all members
- Animated Server Banner
You can get the benefits mentioned above by:
- Either buy Server Boosts separately for your own server at $4.99 per month. Boosted servers get perks such as additional emoji slots, higher audio, and video quality, and animated server icons, depending on how many boosts they’ve received. Or;
- Discord Nitro: this premium subscription tier ($9.99 per month, or $99.99 per year) gets you benefits such as bigger upload size limits, HD video for streaming and screen-sharing, animated avatars, and custom emojis.
Nitro subscribers also get two Server Boosts, which are essentially tokens that you can spend on a server to make it even better.
Pro tip: Subscribing to Discord Nitro might be more cost-effective; as it gets you two Server Boosts for free upon subscription. Those two Server Boosts may last up to 3 months, unlike the Server Boots you buy separately which only last for one month.
Not interested in making your own server?
There are plenty of public servers out there that may be relevant to your interests. If you click the Explore Public Servers icon at the bottom left of the app, you can browse a ton of cool communities, from official servers for games like Minecraft and Fortnite to communities dedicated to things such as game development and language learning, and so on.